Tuesday, April 5, 2016

Birds Under Glass


I was stuck at home recently with a repairman...
I decided to do another quick decoupage project.
It's a vintage glass paperweight 
and I applied a bit of a pretty birds nest napkin to the underside of it.


I stole the idea from my friend Kim, who made one for me a few years ago. 
Here's the one she made for me.


I had picked up this glass paperweight at the flea market for a few bucks.


I like the detail on the bottom edge.


I cleaned it up and got busy.

Here's the napkin before I operated on it.


I set the paperweight over the section of the napkin I liked and traced around it.


Then I cut it out and peeled off a ply of the napkin.


I brushed a coat of Mod Podge onto the under side of the paperweight.
Then I applied the cutout section of the napkin to it, 
right side facing up, 


carefully smoothing out any bubbles and trimming off any excess napkin.


Those white wrinkles and spots will dry clear and not show.

Then I applied another coat of Mod Podge to the napkin and let it dry.

 I cut a small piece of fleece from my scrap pile 


and glued that to the bottom with some more Mod Podge.


It's so pretty and springy.
I love how it turned out.
You and also use this technique on glass plates and jars.
Hmmm.
I have a glass jar.  And more napkins.
See you later!


Linking to:
Metamorphosis Monday at Between Naps on the Porch
The Scoop at Stone Gable
Wow Us Wednesdays at Savvy Southern Style

Pin It!

Monday, March 28, 2016

A Perfect Plan for a Girl's Night In


It's early spring here in our area, 
Meaning it could be 60* tomorrow 
Or it could snow.
Or both.
It's too early to make any outdoor plans, so I've made an indoor one.
A Girl's Night In Party.

The plan includes my favorite movie of all time - 
 "Enchanted April"
and dinner with good friends.

Enchanted April is a wonderful, romantic film 
about women and friendship and love. 
Oh, and it's set on a hilltop medieval castle on the coast of Italy.
So it's a bit of a travelogue, too.
The scenery is glorious and the story is delightful.
It's based on the 1922 novel by Elizabeth Von Armin 
who wrote it while staying in Portofino, Italy, where the castle stands today.

I watched it again recently with my book club 
and we all enjoyed it.
I made an Italian dinner for us 
and then we curled up and watched the movie together


The menu was: 
Lots of Chianti 
Chicken Parmesan Baked Ziti  
Italian Salad 
Crusty bread 
and 
Tiramisu Cake.
Yummmmm.

Here's a link to the Chicken Parmesan Baked Ziti recipe from Gimme Some Oven.
I found the recipe on Pinterest.  
You can follow me on Pinterest here.

Chicken Parmesan Baked Ziti -- all you need are 6 simple ingredients for this comforting and delicious dish! | gimmesomeoven.com
(Photo from Gimme Some Oven)

I used Arrabiatta Sauce 
and I added some chopped pepperoni for more spicy flavor.
It was easy and delicious and I will definitely make this again.

I also made this easy Italian Salad from The Gingham Apron to go with it.
Another Pinterest find.

italian salad
(Photo from The Gingham Apron)

It was just right.

Here's a slice of the Tiramisu cake from a post I wrote abut the recipe.


Add a loaf of crusty bread and your favorite Chianti and you've got it all.

Delicious food and good friends and my favorite movie.
The perfect plan.

I enjoyed it all so much 
that I hijacked the next meeting of my other book club 
and we are going to watch the movie together too.
In April.
Perfect timing.

There are lots of ways to watch the movie.
You can buy the DVD or rent it from Amazon for $2.99.

You can read the book or you can listen to it.
Here's a link to the FULL audiobook, free, on YouTube.

You're welcome, because I just know you'll thank me!
It's Just Grand.


Linking to:
Metamorphosis Monday at Between Naps on the Porch
Inspire Me Monday at A Stroll Through Life
The Scoop at Stone Gable
Wow Us Wednesdays at Savvy Southern Style

Pin It!

Monday, February 29, 2016

Cover those outlets!


I have a pet peeve in kitchen design.

Well, several, actually.  
But for today, let's talk about outlets in kitchens.


Building codes typically require lots of electrical outlets 
to be placed where they make sense, on paper. 
In reality, those places don't always look attractive. 

In a kitchen, outlets are required every several feet in the back splash area.
Where do you put them if your back splash design is important to you 
and the outlets land smack in the middle of them?

I have been designing kitchens for 25+ years 
and this is not a new problem.
With all of the gorgeous, not to mention expensive tile choices available these days, 
good planning is necessary for the end result to look just right.

Nobody wants to end up with this.

                                                   Outlets galore!

I'm not the first person to rail against this problem.  
about outlets and lots of creative ideas to cover them.

In my own kitchen, I wanted an even simpler solution. 
 I didn't use tile, I used V-groove paneling for my back splash areas.


You can see the outlets in these early kitchen photos.


My strategy was to install the outlets horizontally 
and as low as I could talk the electrician into doing.
That way, you can just place something in front of the outlet 
to cover it.  

In the photo below, 
I had him squeeze one in to the corner 


so I could put a little lamp there and not see the outlet.


(Darling Daughter was just home for the weekend and left her mark, above)

I could have painted the outlet covers to match the painted wood, 
but I haven't bothered because I hung some vintage prints there 
and the outlets never show.


With the V-groove paneling, it's easy to pop a tiny nail into the wood 
and hang a artwork right over those offending outlets.

When I need to use this outlet, I just put the print aside 
and rehang it when I'm finished.


Same thing on the opposite side of the cook top.


The prints are nice because they don't take up any working counter space  
and that's always a priority for me.

I did the same thing in my trusty old oak kitchen...


If you have tile, you can always just lean prints 
or cutting boards against the outlets, too.


I love this look from Patina Farms. 
This could work in a back splash area too.


My island has outlets, too, but I buried them 
in the overhang space where the seats are-

Because I wanted to avoid doing this...


to this...


This end panel is too pretty to disfigure with an outlet, don't you think?


The outlets are barely noticeable under the overhang, as you can see below.


It's easy to sit at the island and plug in a laptop 
or plug in the mixer if I'm making cookies and want to spread things out.


So, cover those outlets.
That's my helpful little tip for the day.


Linking to:
Metamorphosis Monday at Between Naps on the Porch
Inspire Me Tuesday at A Stroll Through Life
The Scoop at Stone Gable

Pin It!

Monday, February 22, 2016

Handmade Gift Tags


It's that Cabin Fever time of year.
I'm home, it's cold out and I'm getting crafty.

I don't know about you, 
but I am often wrapping a wine bottle as a gift, 
usually at the last minute, 
and 
I struggle to find a gift tag that is unique and personal.
And worthy.


 I love making gift tags.
Quick little crafts that are also functional!

When Mr. Grand asks "So, what did you do today?"
I can say "I saved enormous amounts of money 
making a gift tag for the party tonight!"
I am so virtuous.

I wrote this post about the gift tags 
that I made for a wedding shower gift 
using small canvases and Mod Podge. 


I've been scouring Pinterest for some new ideas 
for gift tags 
and found some really great stuff.

Here's a link to my Pinterest board.  
I'd love it if you'd follow me along!

Anyway, lots of cross brain idea waves bouncing around.
I had a supply of plain kraft paper tags 


to use as the basis for something fun.

I got those out and 
Then I dug into my stash of napkins that must be hoarded for crafts
and I found these gorgeous floral designs. 


I decoupaged a few napkin scraps onto tags and added sheer ribbon ties.
They turned out so pretty. 


While searching my stash, I spotted a sheet of thin cork 
that I had bought at Hobby Lobby for something, someday.
I do that way too often.
And I thought hmmmm...
Cork tags for wine bottles!

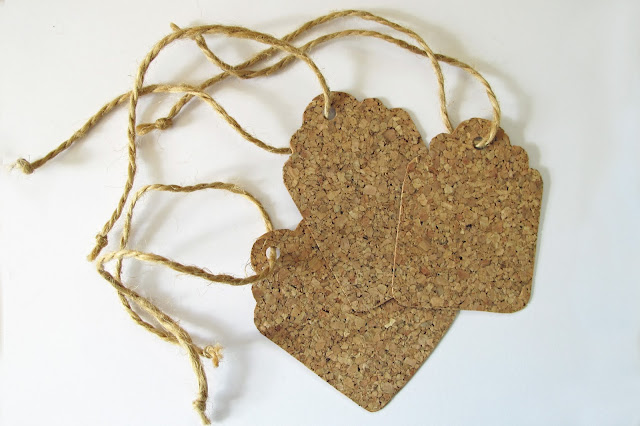
So, using the kraft paper tag as a template, I cut out some tags.


I cut them a little shorter because I liked the size better 
and I could make more 
and there would be less waste.
Remember, I am virtuous.


Then I added some jute twine to tie them with.
I tied knots on the ends to keep the twine from unraveling 
and because I like how they look.


And here they are!


They look great 
tied onto a bottle of my favorite Chardonnay 
made by our friends, Tom and Joan, 
at their winery, Blustone.


I wrote a post about their adventures here.
They are still making great wines 
and winning international awards for their efforts.

These wines need worthy tags.


These just might do.


Linking to Parties at:
Metamorphosis Monday at Between Naps on the Porch
The Scoop at Stone Gable
Inspire Me Tuesday at A Stroll Through Life
Wow Us Wednesdays at Savvy Southern Style

Pin It!

Monday, February 8, 2016

Living Large in Small Spaces


Funny story.
Recently, I was honored to be asked to write a blog post 
about our little cottage on the lake 
for the blog A Joyful Cottage.
.
Nancy, the Joyful Cottage blogger, had seen some photos on Houzz 
of our cottage that were taken by Gridley and Graves 
for a feature in Cottage Style Magazine.

for a series on her blog called Living Large in Small Spaces.
My sweet blogger friend Lynne from Irish Garden House 
saw the pictures, recognized our cottage and sent me a link.
And then Nancy contacted me and asked me to tell the rest of the story.
It seemed like a good idea
and it forced me to organize all of my posts
about the cottage into one easy to read place.


So, here's the Joyful Cottage post!

A Joyful Cottage

Hello, Joyful Cottage Readers!
My name is Erin and I write a blog called Just*Grand. 
It's a blog about ideas, designs, crafts, renovations, recipes 
and anything else that I think is - Just Grand!

I was thrilled when Nancy at a Joyful Cottage 
asked me to share the story of our Little Cottage by the Lake.
I am always happy to talk about our little cottage.  
It's been a true labor of love!

Let's start at the very beginning.
I have always, always wanted a cottage by a lake.
A little cottage.  By a big lake.  Like Lake Michigan.
I wanted big sky and sunsets and sandy beaches and crystal clear water.
I wanted to be able to see weather fronts approaching.
I am awed by the wind and the clouds and the power of the lake.

We found one such cottage on a bluff overlooking Lake Michigan, 
only an hour and a half drive from our home.
It was a sad little cottage, shabby and much neglected-
Which was perfect for me.  
I love a good project and this one promised to be huge! 
We took a leap and have never looked back.

Ours is the second one in from the left.
These cottages were built about 80 years ago, as housekeeping cottages 
where families came to enjoy the cool breezes by the lake.


We share the lawn with the other cottages
and we play games and host parties
and at least one family even had a wedding there.
Here's a view from across the lawn.


Our cottage actually looks charming, from a distance!

This picture below shows what truly awful condition it was in.


Horrible.
But the setting was great and the bones were good. 

We had to replace virtually everything, inside and out.
Here's how it looks after our renovations.
This will make your eyes feel better....


New roof, siding, windows, doors, deck, landscaping 


We had the power lines that were attached to the front of the cottage buried
and what a difference that made!

Here's how the back of the cottage looked when we bought it.


So shabby!

Here's how it looks after the renovations.

We added an outdoor shower that is just heavenly.

And last summer, we added this little railing by the back steps...


Those before pictures hurt my eyes.
Look at this instead.


That's better. 
That's why we're here!
The Lake.
Remember this, because there are more ugly Before pictures coming.

On the inside, we replaced everything too.
All new electric, plumbing, hardwood floors, drywall, molding, 
vaulted ceilings, skylights, a loft, 
a new kitchen and a new bathroom.


Here's a picture from the main living room, Before.


And that same view now...


Believe it or not, the burnt orange fireplace was salvaged by a friend of the builder's!
And I do not miss it. 

Here's the front porch room, before.


And here's how it looks now.
And a link to a post I wrote about it.


This is another photo by Gridley and Graves. 
They made it look so dreamy.

Let's look at the kitchen.
Warning- Not pretty.

That's the hot water heater under the little window 
and it was taking up precious space in the kitchen.
We moved it up to the attic. 
And we saved that one cute little window.
My husband spent an entire weekend stripping and refinishing it 
and then decided we needed all new windows.

I was able to find someone who wanted to salvage the old windows.  
They were really cute, but very dilapidated and not insulated.  
and what they do with salvaged wood.


Here's how the kitchen looks now.


Another view


On to the bathroom.  
REALLY UGLY.
Keeping the pictures small because they are so ugly.


Here's the bathroom now...


The tub was scooped up by a neighbor who longed for a vintage claw foot tub. 
We were happy to help!

Here's a detail of the tile in the shower.


And the watery blue floor


Ahhhhh.


We made some changes in the master bedroom, too.
Here's a picture of the room before it was redone.


This photo by Gridley and Graves shows how the same bedroom wall looks now.


We tore out the closet in the corner 
and added two small closets on the opposite wall, on either side of the window, below.


We also removed the plywood ceiling and paneling from the walls 
and had the ceiling in the room vaulted. 

We put the little salvaged window from the kitchen 
up into the new gable wall 


and had a skylight installed over the bed.  
It's lovely to lay in bed and see the stars or watch it snow.


Here's a peek into the tiny second bedroom. 
My son calls it the closet with some shelves you can sleep on!


It's tiny but it works!


The colors I used in the cottage were inspired by the colors at the beach
and by the beach glass that constantly washes up in the sand.


So, I got my wish...

Big sky, sandy beach, clear blue water...
You can see the weather coming when it's hours (or minutes away)!


And the sunsets!


It's all Just*Grand!


Thanks, Nancy!


Linking to: 
Metamorphosis Monday at Between Naps on the Porch
Inspire Me Tuesday at A Stroll Through Life
The Scoop at Stone Gable
Inspire Me Monday at Sand and Sisal
Wow Us Wednesday at Savvy Southern Style

Pin It!