Been away...
Haven't seen you in a while
How've you been?
Have you changed your style?
(Thanks, Dave Mason)
Happy New Year!
I know, it has been a while since I have posted.
We were away, visiting family for Christmas-
over the river and through the woods to Grandmother's houses...
Hope you have all had a wonderful Holiday season.
I am ready to get this 2012 year started!
Here's a craft project I'd like to share with you.
Mr. Grand and I made sets of wine cork coasters for Christmas presents this year
and I think they were a hit.
In December, we had a lovely dinner with good friends at a Michigan winery
and we spotted coasters made from wine bottle corks in their gift shop.
Light bulbs went off and the project planning commenced.
I could not have made these without the help of Mr. Grand, as I am terrified of power tools...
Good thing he likes a project, too!
He was also invaluable in the acquisition of the wine corks!
As Martha Stewart likes to say (and I like to quote)
here is "a small portion of my collection" of wine corks!
Now before you start to worry about our drinking habits,
I must tell you that these corks were scrounged collected over time-
from parties, restaurants and bars and friends who know we save them.
And the corks are still coming in...
Here is how we made them:
Supplies:
We bought 12" square cork bulletin board type tiles from Staples (about $9.99 for a package of four)
and some Elmer's Wood glue that holds up to moisture.
You will need at least four whole wine bottle corks per coaster.
There will be some waste as not every cork has two useable, coaster worthy halves.
We used a new blade in a box cutter to cut the cork tiles into 3 1/2" coaster size squares.
Sizes are approximate because the squares had to be trimmed to fit the assorted corks we used.
Mr. Grand cut the corks on his band saw and I "designed" the patterns and glued them together. Believe me, there are lots of different sizes of corks - some are chubby, some are long, some are ugly, some even have phone numbers on them... We did not use any plastic corks.
We tried to use the most interesting corks and we also tried to include corks from the favorite wine of the recipients too. Friends of ours have a Vineyard in Michigan (How cool is that???) and we included corks from their wine as well as other Michigan wines on the set of coasters we made for them.
Here is the assembly line...
We were careful to cut the corks so that there was something interesting centered on them.
Here is the scary band saw used for slicing the corks in half:
Here's a shot of the jig Mr. Grand made so that he could cut the corks evenly in half
and spare his fingers at the same time. The wooden part of the jig holds the corks snugly in place and the plastic putty knife underneath keeps them level while they are being sliced.
What can I say? He's an engineer...
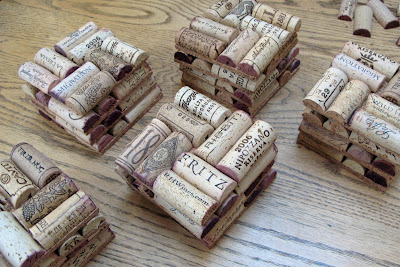
I assembled eight cork halves on each coaster until I liked the mix and the fit and then I glued them into place. You can see in the very center of the corks below how we offset them a little to make them fit on a square cork coaster.
We liked the look of the red wine on the edges on some of the corks so I tried to put them on the outside whenever possible. Then we trimmed them up a bit where necessary to get a neat square that fit the glued-on corks. They took several hours to dry.
Here are stacks of coasters, hot off the assembly line!
Each of the four 12" cork bulletin board squares made 9 coasters, so we were able to make
three dozen coasters from one package.
I liked the look of them wrapped up in sets of four.
Here are the coasters already in use... rather Grand, aren't they?
I think these will make great hostess gifts when we attend fabulous parties this year...
Hint, hint...
See you in 2012???
Joining up with:
| Between Naps on the Porch |
| A Stroll Thru Life |
| The Tablescaper |
| Linky Party |
| Linky Party |
| Linky Party |
| Linking to I Can't Stop Crafting |


Sooooo creative!!! Pretty soon you'll have your own magazine!! design sheets and give recipes for canning those precious herbs from your garden and who knows what else - so gifted and very good text to read - seems to me I know that Mr. Grand also - he has an imaginaion too like looking for Santa up a fake fireplace??!!!!
ReplyDeletecw
The coasters look terrific! What a great gift a set of them makes! Very clever, indeed.
ReplyDeleteThanks for sharing this great project...I came over to visit from Nifty Thrifty Tuesday...These are great! xo
ReplyDeleteVery cute! We've made 'wine cork art' and custom coasters, but didn't think to combine the projects. Well done.
ReplyDeleteHappy 2012!
Pam
How fun, I am still collecting corks, so this is a project for the future. Thanks for the tutorial. Thanks also for joining TTT. Hugs, Marty
ReplyDeleteThanks for visiting! I took a tour of your home improvements and...WOW!...I am so impressed and inspired! Great work! Thanks for sharing...you and I have lots of things we both love! Awesome!
ReplyDeleteHappy New Year!
Coralie
Dear Erin,
ReplyDeleteYour blog is fantastic. I can hear your voice through your written words. Who knew there was such an industrious endeavor going on next door???
Great photos. Clear descriptions and illustrations. I think anyone who loves wine would appreciate this artful gift.
Happy 2012.
Mark
I like your idea and your tutorial! I will try this next with my pile of corks I'm collecting again!
ReplyDeleteIf you are interested in a wine cork wreath project, here is the post from my site....
http://www.everydayalamode.com/2011/11/wine-cork-wreath.html
Happy 2012!
Such a fantastic project!! Wow -- anyone would be (or should be!) thrilled to get a set of these!
ReplyDeleteSuch a neat idea and a great gift to give! I love it!
ReplyDeleteI love it!! Such a great idea and so creative! I'm happy no fingers were lost in the process!!
ReplyDeleteJoining your blog today...drop over to visit with me soon...gift-away going on!!
www.southernjunkin.blogspot.com
Hi Erin,
ReplyDeleteThanks for the coasters.
I love them!
XXOO, Kim
These are awesome! I just had a friend who was telling me that she wanted to make these!
ReplyDeleteI'm going to do a feature of this on FB!
Thanks for linking up to Tell it to Me Tuesday!
--Katie
@Creatively Living
Very cool & creative....
ReplyDeleteMy DIL was just telling me that she made "Cork boards" as gifts, cutting them just like you did... I may try your idea...
Nicely done
Erin,
ReplyDeleteThese coasters are really cool! I am so glad that you shared these with us! I'm off to check out some of your other projects! Take care!
i love this idea! and don't you and your hubby make a "grand" team??
ReplyDeletehave you seen the youtube video that shows how anthropologie designers used corks in their windows? yep, it'll keep your pile growing!
I really love this idea! Just saw your picture on pinterest...
ReplyDelete